This week I tried to configure and program a gen4 IoD 24T color display with resistive touch panel from 4D Systems for an IOT project. The display has an integrated ESP8266 and therefore WIFI. We had bought the whole kit, which means display, universal programmer adapter and some cables. There was no quick start guide in the kit and I couldn’t find it on the 4D systems webite! Although there is a lot of documentation around, it was pretty hard to find out how to get the display working, because there were essential informations lacking, for example how to connect the cable between programmer and display or how to connect the programmer to your notebook (dont use the cable that came with the kit).
Components
- SK-gen4-IoD-24T (Starter Kit) with:
- Display GEN4-IOD-24T
- 4D universal programming adaptor
- 5.5mm wide 10 pin FFC cable
- Micro USB cable
- PC or Notebook with Windows 7 or 10 (I don’t know whether and how it works on Linux or Mac)
Hardware
Connect the display with the 10 pin FFC cable and the universal programming adaptor as shown in the image. The writing on the cable has to be on the upper side.
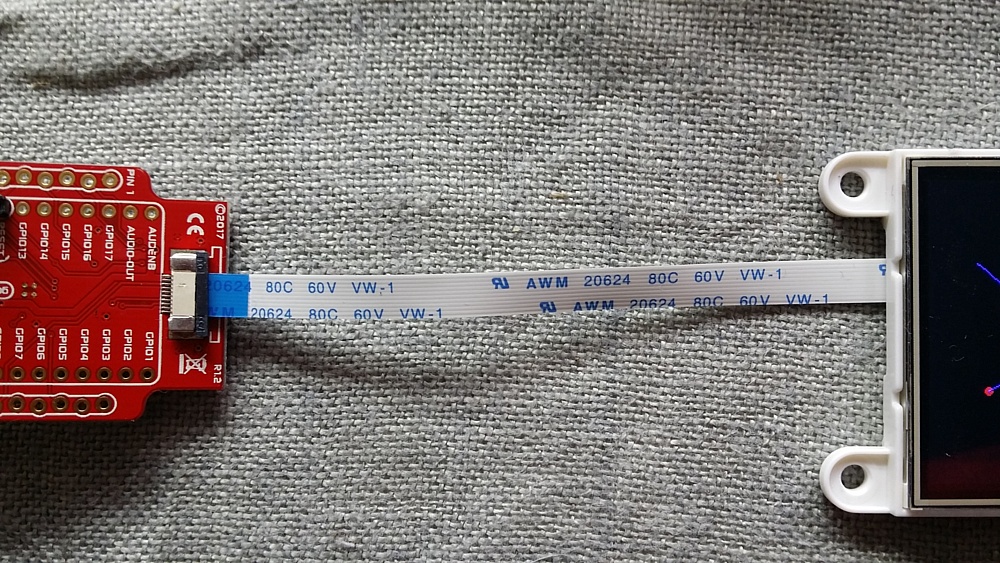
Connection display GEN4-IOD-24T to 4D universal programming adaptor
Then connect the universal programming adaptor with the micro USB cable to your PC or notebook.
Software and Drivers
- Fetch the Silicon Labs CP210x USB to UART Bridge Driver and install it
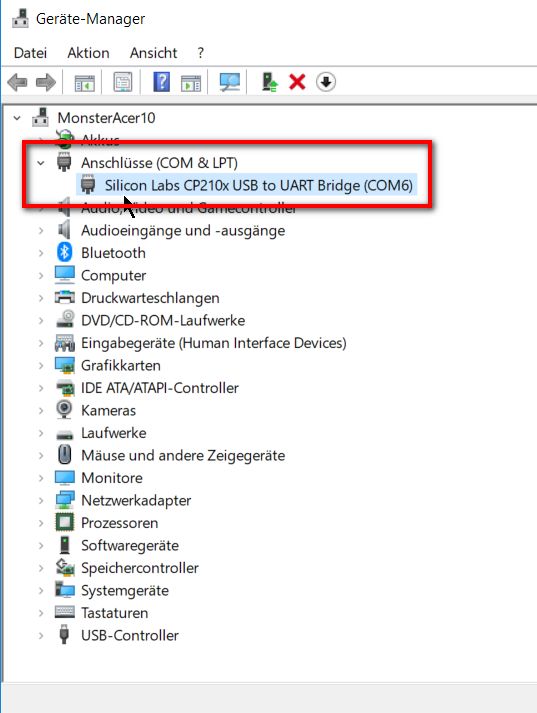
https://www.silabs.com/products/development-tools/software/usb-to-uart-bridge-vcp-drivers - Control in the windows device manager that the driver is correctly installed. It will be shown under „Ports (COM & LPT). The COM number you see here you will need to configure your Arduino IDE (and Workshop4 if you work with this tool from 4D systems).
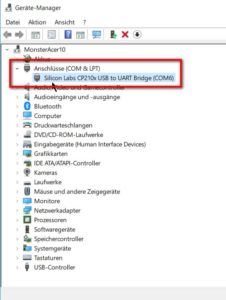
CP210x USB to UART Bridge VCP driver in windows device manager
- Download the GFX4d library as a ZIP file from https://github.com/4dsystems/GFX4d
- Download the newest Arduino IDE from https://www.arduino.cc/en/Main/Software and install it (mine was 1.8.5)
- Open the Arduino IDE, go to File – Preferences – tab „Settings“ and insert the following URL into the field „Additional Boards Manager URLs“:
http://arduino.esp8266.com/versions/2.4.1/package_esp8266com_index.json - Open Tools – Board:… – Boards Manager in the Arduino IDE and search for esp8266. Install the latest version of the ESP8266 Community version (in April 2018 this was 2.4.1)
- Configure the COM number from the windows device manager in the menu Tools – Port
- Configure the board with Tools – Board:… – 4D Systems gen4 IoD Range (nearly at the end of the list)
- Open Sketch – Include Library – Open .ZIP library… and search for the ZIP file GFX4d zip file you have downloaded before
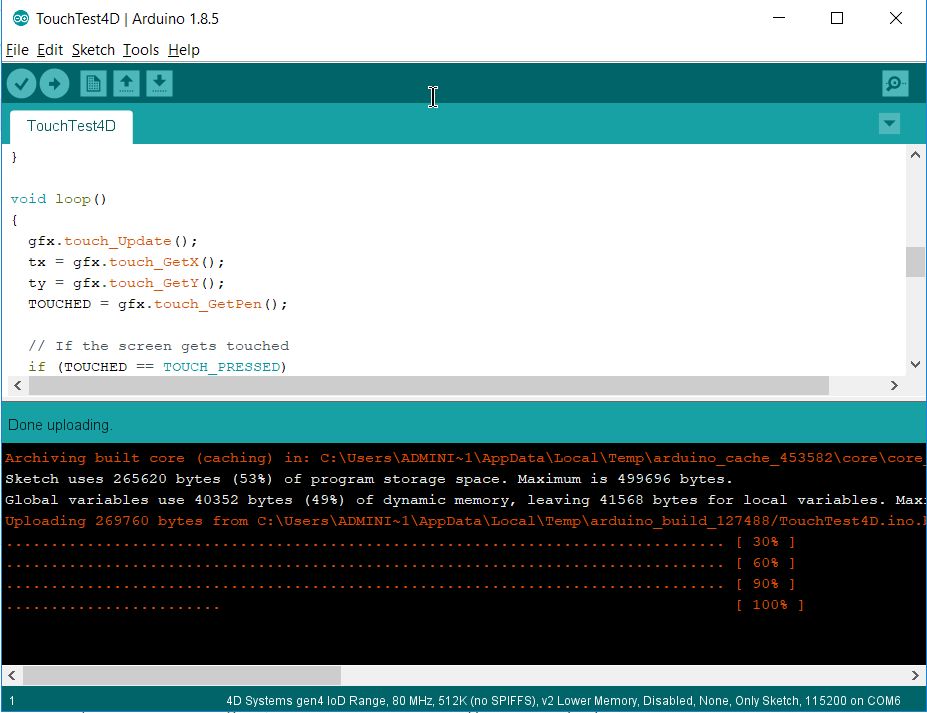
- Load one of the examples that come with the library to test your configuration, for example: File – Examples – GFX4d-master – Examples – TouchTest4D
- Compile and upload the sketch with Sketch – Upload. If you were successful you will see in the lower part of the IDE an orange text ending with „[ 100% ]“
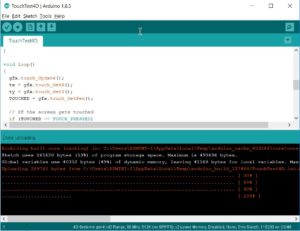
Arduino IDE after successful upload of the sketch
The first sketch is really working:
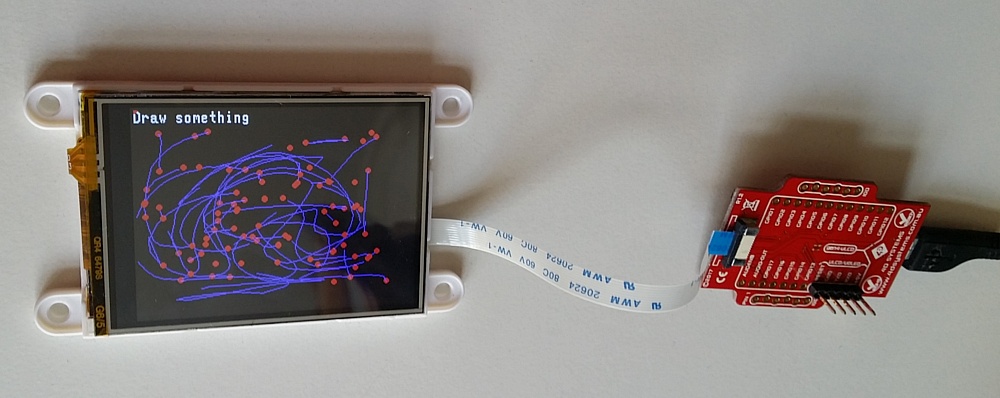
Display GEN4-IOD-24T with TouchTest example sketch
Programming Tools
Take care: 4D Systems is suggesting, that you install their own Workshop4 IDE and work with it instead of the Arduino IDE. For the GEN4-IOD-24T this is misleading:
- First you must have installed an Arduino IDE anyway because the Workshop4 IDE uses the Arduino IDE for compiling and uploading.
- Second the nice visual tools like VisiGen in the Workshop4 IDE cannot be used with the forementioned display (maybe later, but in April 2018 there were no wizards and graphical tools available). Basically you program your code in a text editor with the commands of the included GFX4d library. That is the same what you would do in the Arduino IDE. Therefore I see no advantage in installing and using the Workshop4 IDE. If you want to have an IDE with code completion take Visual Studio Code and the Arduino plugin (currently Arduino 0.2.11 from Microsoft). With some configuration you can develop and upload your code directly into the display from there.
- Third there is no single code example for the GEN4-IOD displays in the large collection of samples integrated in the Workshop4 IDE. The samples you have come with the GFX4d library and you can load them in the Arduino IDE as any other library samples. Absolutely no need to install the Workshop4 IDE for this.
SD-Card
There is another problem when using the samples or programming your own interface: Many of these examples and programs use the SD card. This card has to be formatted in FAT16. Unfortunately newer Windows version no longer support FAT16. Fortunately I had an old notebook where I could format FAT16 and read and write the card. And with the tool integrated in Workshop4 I could test the card with the uSD tester on the tools menu, but I found nothing to copy the necessary files to the card.
4Duino as an alternative
After playing around with this display I came to the conclusion that it is not the best choice for our project. The only interface you have is this 10 pin FFC cable. There is no plug for power and there are no pins to connect any sensors and actors. Therefore you need another microcontroller anyway. And there are only 6 examples that come with the library and none of them is really useful for our task.
At the moment the 4Duino from 4D Systems seems to be the much better choice. It is a Arduino compatible microcontroller with integrated display, WIFI, SD card on board and 20 pins (7 with PWM and 12 with analog input).
Useful documentation
You will not only need the official gen4-IOD datasheet (which is not a pure datasheet but also a tutorial), but also the Universal programmer Adaptor datasheet.
- 4d systems official datasheet and tutorial for the display: http://www.4dsystems.com.au/productpages/gen4-IoD/downloads/gen4-IOD_datasheet_R_1_1.pdf
- 4d systems official datasheet and configuration guide for the universal programmer: http://www.4dsystems.com.au/productpages/4D-UPA/downloads/4D-UPA_datasheet_R_1_2.pdf
- IoD Arduino Library Documentation is the main source for programming this display.
 Download des Artikels als PDF File
Workshop 4 does indeed provide an easy to use drag & drop style widget tool for the gen4-IoD series so a complete GUI can be designed in workshop 4 with pre-generated commands using the paste code button to control the widgets. All graphics images are then stored on the SD card in a fat16 format and a tool is provided in Workshop 4 to format the SD card to fat16. The IoD is also compatible with fat32.